Conectar a Tor
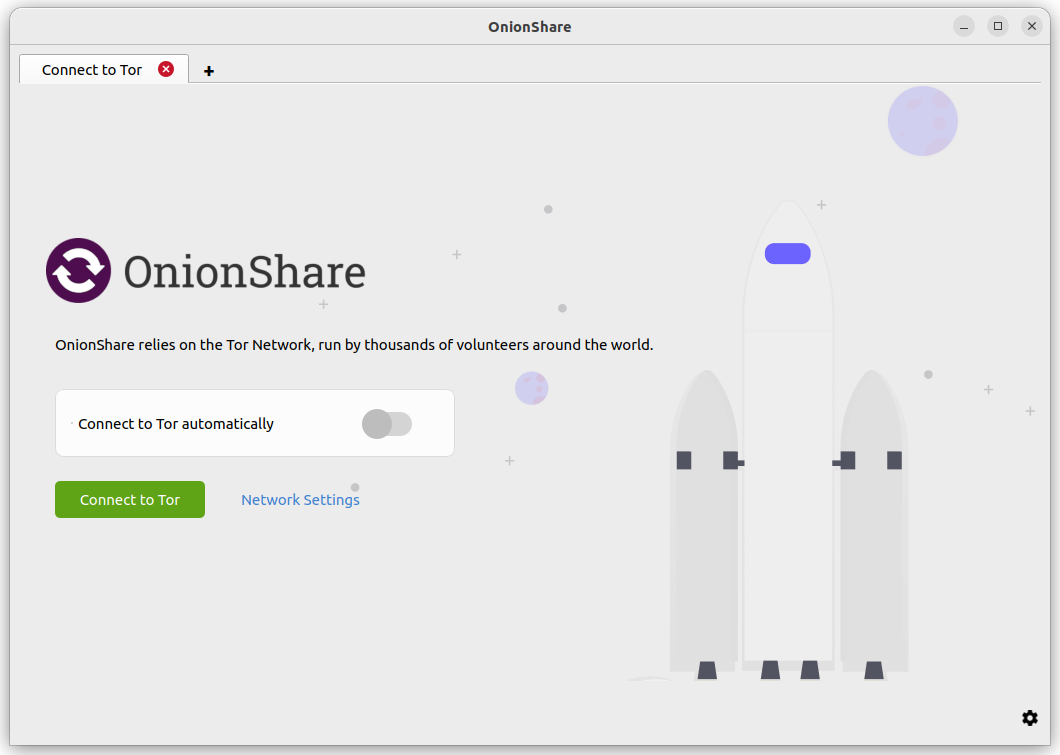
When OnionShare starts, it will show you a screen asking you to connect to the Tor network.
Elija una manera de conectar OnionShare a Tor haciendo clic en Configuración de red en la pantalla de bienvenida, o en el icono de cebolla de Tor en la parte inferior derecha de la ventana de OnionShare para abrir la pestaña Configuración de Tor.
You can click «Connect to Tor» to begin the connection process. If there are no problems with your network, including any attempts to block your access to the Tor network, this should hopefully work the first time.
Or, if you want to manually configure Bridges or other Tor settings before you connect, you can click «Network Settings».
Automatic censorship circumvention
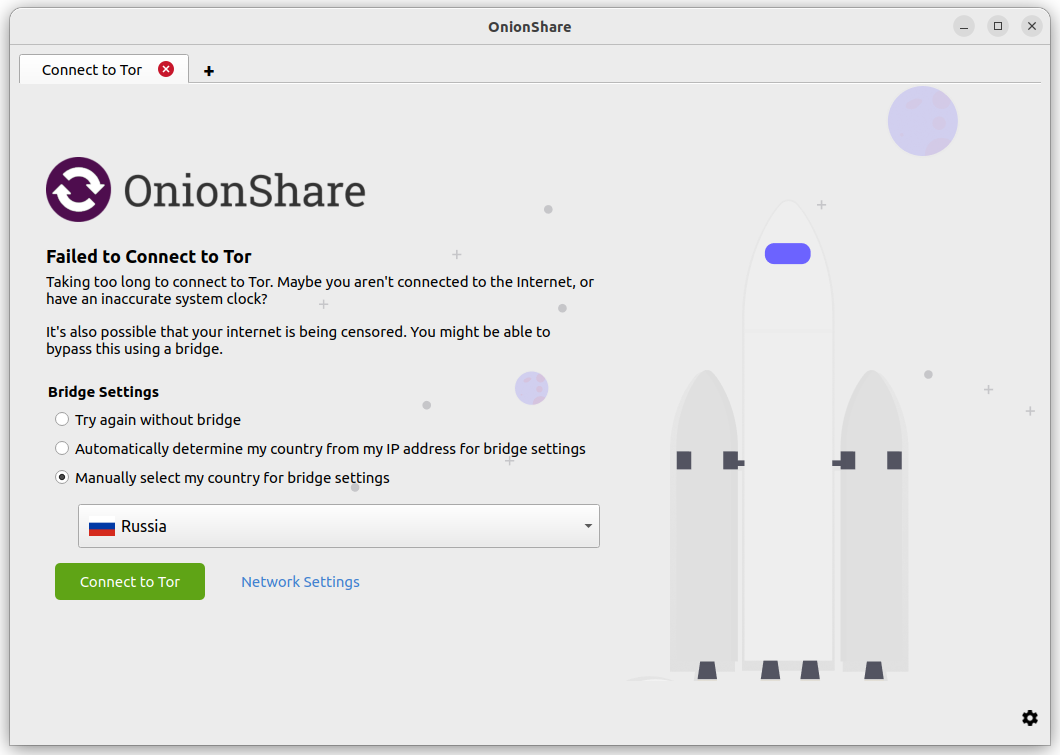
When you click «Connect to Tor», if OnionShare fails to connect, it might be because Tor is censored in your country or on your local network.
If this occurs, you will have these choices:
Try again without a bridge
Automatically determine my country from my IP address for bridge settings
Manually select my country for bridge settings
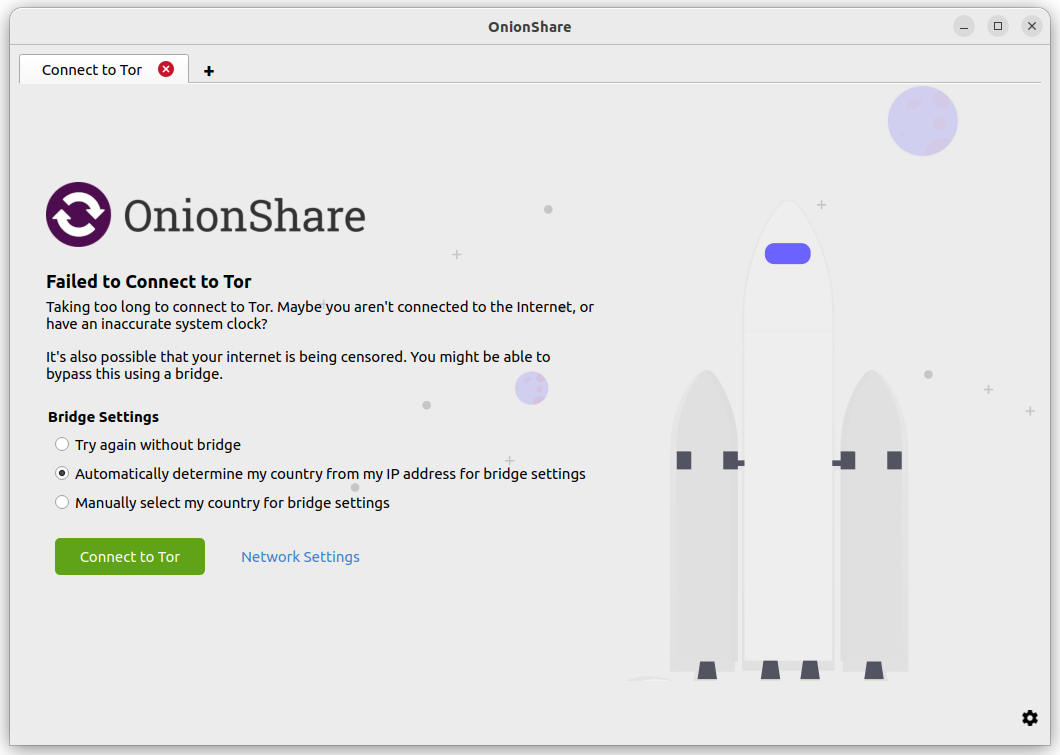
If you choose the «Try again without a bridge» option, OnionShare will retry connecting to Tor like normal, without attempting to bypass censorship.
The other two options will attempt to automatically bypass censorship using Tor bridges. If your network provider is blocking access to the Tor network, you can hopefully still connect to a Tor bridge, which will then connect you to the Tor network, circumventing the censorship. Both of these options use the Tor Project’s Censorship Circumvention API to provide you with bridge settings that should work for you. OnionShare will temporarily use the Meek domain-fronting proxy to make a non-Tor connection from your computer to Tor’s Censorship Circumvention API. The Meek proxy hides the fact that you are trying to find a way to connect to Tor.
If you choose «Automatically determine my country from my IP address for bridge settings», the Censorship Circumvention API will consider your IP address (yes, your real IP address) to determine what country you might reside in. Based on the country information, the API will try to automatically find bridges that suit your location.
If you choose «Manually select my country for bridge settings», the Censorship API will find the bridges that suit the country that you specified.
How automatic censorship circumvention works
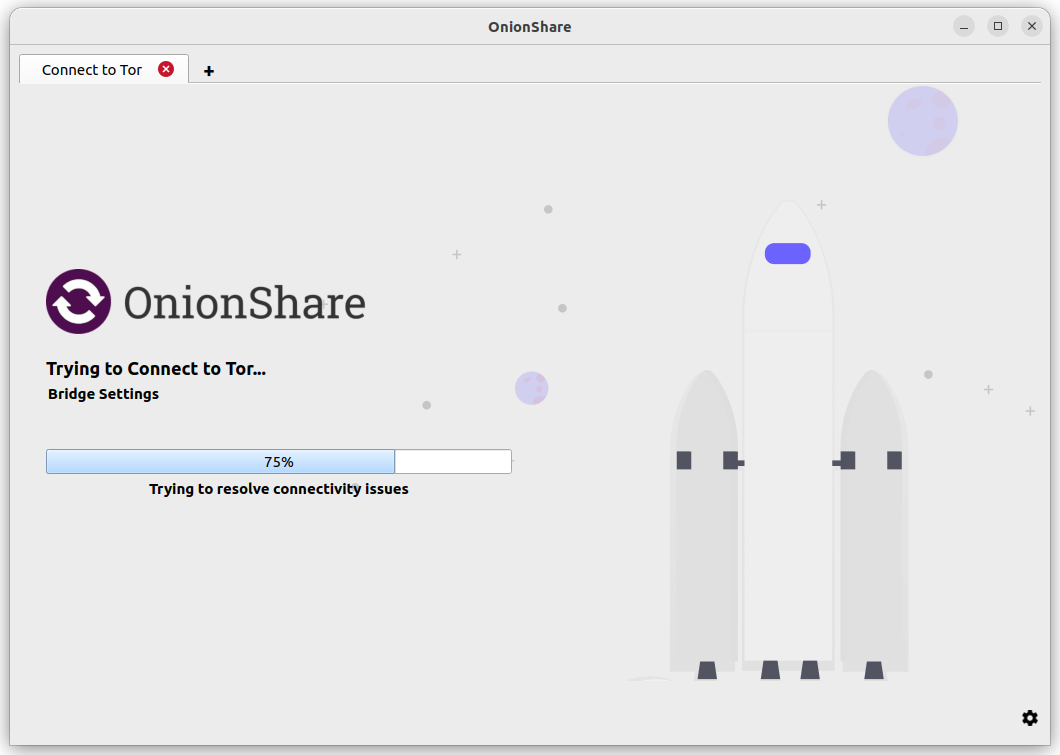
If the Censorship Circumvention API finds bridges that it believes will suit you, OnionShare will try to reconnect to Tor using those bridges. If the API does not find any bridges for your location, OnionShare will ask the API for «fallback» options, and then try to reconnect using those.
If for some reason OnionShare fails to connect to the Censorship API itself, or if the API returns an error message, OnionShare will attempt to use the obfs4 built-in bridges.
It’s important to note that the requests to the Censorship Circumvention API do not go over the Tor network (because if you could connect to Tor already, you wouldn’t need to connect to the API).
Even though it’s hard for an adversary to discover where the Meek request is going, this may still be risky for some users. Therefore, it is an opt-in feature. The use of Meek and non-torified network requests are limited only to making one or two requests to the Censorship Circumvention API. Then Meek is stopped, and all further network requests happen over the Tor network.
If you are uncomfortable with making a request that doesn’t go over the Tor network, you can click «Network Settings» (or the Settings icon in the bottom right corner, followed by the Tor Settings tab in the screen that appears), and manually configure bridges. After you save any bridge settings, OnionShare will try to reconnect using those bridges.
Manually configure Tor settings
You can get to the Tor settings by clicking «Network Settings» on the welcome screen, or by clicking the «⚙» icon in the bottom-right corner of the application, and then switch to the Tor Settings tab in the screen that appears.
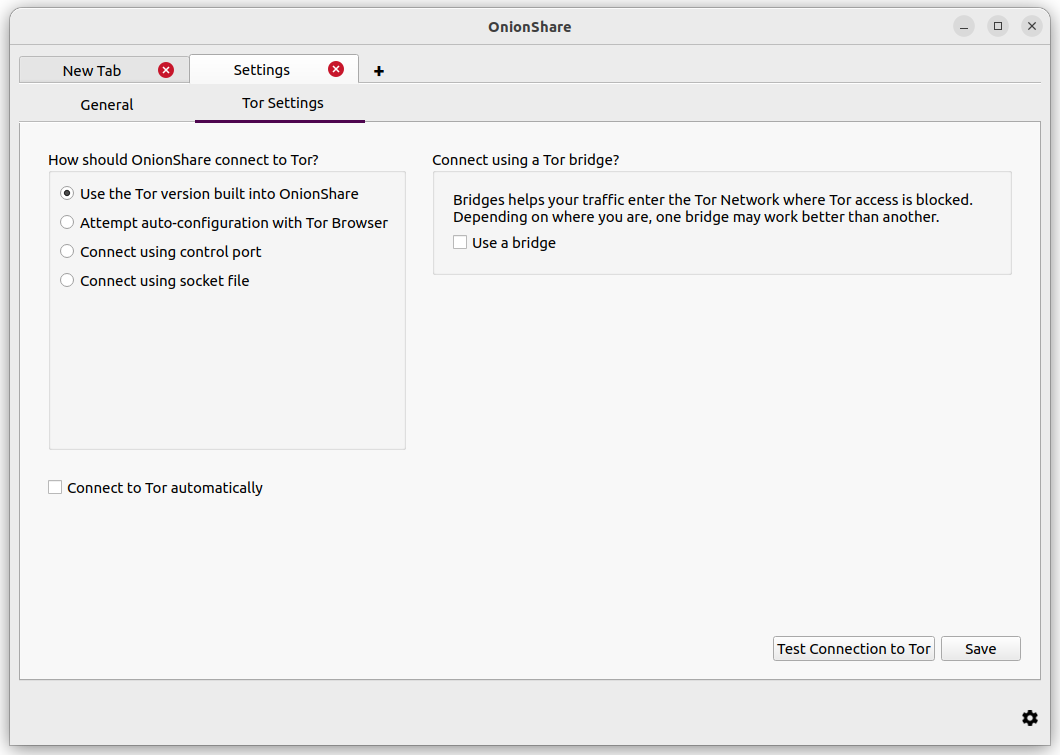
Here are the different ways you can configure OnionShare to connect to Tor:
Usa la versión de Tor incorporada dentro de OnionShare
Esta es la manera predeterminada en la que OnionShare se conecta a Tor, y también es la más simple y confiable. Por esta razón se recomienda para la mayoría de los usuarios.
Cuando abres OnionShare, se lanza un proceso tor ya configurado, para que este lo use en segundo plano. No interfiere con otros procesos tor en tu computadora, por lo que puedes usar el Navegador Tor, o el tor de sistema, por su cuenta.
Using bridges
To use a bridge, you must select «Use the Tor version built into OnionShare» and check the «Use a bridge» checkbox.
Primero intenta usar un puente incorporado. Usar puentes obfs4 o snowflake es recomendado, en vez de usar meek-azure.

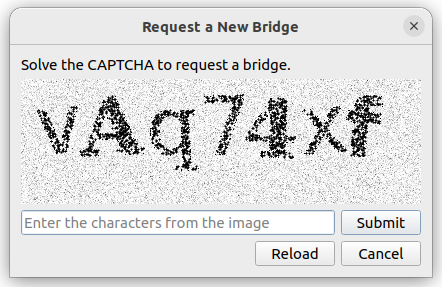
Si usar un puente incorporado no funciona, puedes solicitar un puente de torproject.org. Tendrás que resolver un CAPTCHA a los efectos de solicitar un puente. (Esto hace que sea más difícil a los gobiernos o ISPs bloquear el acceso a los puentes Tor.)
También tienes la opción de usar un puente del que te hayas enterado por una fuente confiable.
Intentar configuración automática con el Navegador Tor
Si descargaste el Navegador Tor y no quieres dos procesos tor ejecutándose, puedes usar el proceso tor del Navegador Tor. Ten en cuenta que necesitas mantenerlo abierto en segundo plano mientras estés usando OnionShare para que esto funcione.
Usar un tor de sistema en Windows
Esto es bastante avanzado. Necesitarás saber cómo editar archivos de texto y hacer cosas como administrador.
Descarga el Paquete Experto para Windows de Tor from. Extrae el archivo comprimido y copia la carpeta extracida en C:\Program Files (x86)\ Renombra la carpeta extraida con las subcarpetas Data y Tor en ella a tor-win32.
Inventa una contraseña para el puerto de control. (Usar 7 palabras en secuencia, como comprised stumble rummage work avenging construct volatile es una buena idea). Ahora abre una ventana para línea de comando (cmd) como administrador, y usa tor.exe --hash-password para generar un hash de tu contraseña. Por ejemplo:
cd "C:\Program Files (x86)\tor-win32\Tor"
tor.exe --hash-password "comprised stumble rummage work avenging construct volatile"
La salida del hash de la contraseña se ve después de algunas advertencias (que puedes ignorar). En el caso del ejemplo de arriba, es 16:00322E903D96DE986058BB9ABDA91E010D7A863768635AC38E213FDBEF.
Ahora crea un nuevo archivo de texto en C:\Program Files (x86)\tor-win32\torrc y escríbelo en él, reemplazando el HashedControlPassword con el que acabas de generar:
ControlPort 9051
HashedControlPassword (the hash you generate from the password you picked above)
En tu ventana de línea de comando como administrador, instala tor como servicio usando el archivo torrc apropiado que acabas de crear (como se describe en https://2019.www.torproject.org/docs/faq.html.en#NTService). De esta manera:
tor.exe --service install -options -f "C:\Program Files (x86)\tor-win32\torrc"
¡Ahora estás ejecutando un proceso tor de sistema en Windows!
Open OnionShare, click the «⚙» icon in it, and switch to the Tor Settings tab.
Under «How should OnionShare connect to Tor?» choose «Connect using control port», and set
«Control port» to 127.0.0.1 and
«Port» to 9051.
Under «Tor authentication settings» choose «Password» and set the password to the control port password you picked above.
Click the «Test Connection to Tor» button.
If all goes well, you should see «Connected to the Tor controller».
Usar un tor de sistema en macOS
Primero, instala Homebrew si es que todavía no lo tienes, y luego instala Tor:
brew install tor
Ahora configura Tor para permitir conexiones desde OnionShare:
mkdir -p /usr/local/var/run/tor
chmod 700 /usr/local/var/run/tor
echo 'SOCKSPort 9050' >> /usr/local/etc/tor/torrc
echo 'ControlPort unix:"/usr/local/var/run/tor/control.socket"' >> /usr/local/etc/tor/torrc
E inicia el servicio Tor de sistema:
brew services start tor
Open OnionShare, click the «⚙» icon in it, and switch to the Tor Settings tab.
Under «How should OnionShare connect to Tor?» choose «Connect using socket file», and
set the socket file to be /usr/local/var/run/tor/control.socket.
Under «Tor authentication settings» choose «No authentication, or cookie authentication».
Click the «Test Connection to Tor» button.
Si todo va bien, deberías ver «Conectado al controlador Tor».
Usando un tor de sistema en Linux
Primero, instala el paquete tor. Si estás usando Debian, Ubuntu o una distribución de Linux similar, es recomendado usar el repositorio oficial del Tor Project.
Luego, agrega tu usuario al grupo que corre el proceso tor (en el caso de Debian y Ubuntu, debian-tor) y configura OnionShare para conectarse al archivo socket de control de tu tor de sistema.
Agrega tu usuario al grupo debian-tor ejecutando este comando (reemplaza username con tu nombre de usuario real):
sudo usermod -a -G debian-tor username
Reboot your computer.
After it boots up again, open OnionShare, click the «⚙» icon in it, and switch to the Tor Settings tab.
Under «How should OnionShare connect to Tor?» choose «Connect using socket file».
Set the socket file to be /var/run/tor/control.
Under «Tor authentication settings» choose «No authentication, or cookie authentication».
Click the «Test Connection to Tor» button.
Si todo va bien, deberías ver «Conectado al controlador Tor».